
Saturday, April 11, 2015
How to make cork popping bugs and why you should avoid them that all costs
Our lab was undergoing a major renovation, and all stuff had to be removed from the north wing. It had been a chemistry lab for decades, but had been shut down for 20 years. Good stuff got saved, surplused, sent to other labs, or donated to high school chemistry programs. But there was still a ton of junk left that was destined for the dumpster. Our solution was to put it out on the free table for a day or two for anyone to take, and then finally send it to the junkyard. I had a moment of nostalgia when a big bag of vintage cork test tube stoppers showed up and I got the idea of using them to create some of the vintage poppers of my youth. This went south in a heartbeat.
First, cork poppers have been supplanted almost completely by foam, and I now know why. They are a pain. First, you have to shape the cork. This is done by sanding, but there really is not an effective way of holding the cork other than to run a needle through it. This may or may not hold. Once you do get it sanded, it usually has pits that need to be filled to give it that smooth surface. I rooted around the shop for wood filler and it worked, sort of.
There is one decent website that advises using an acrylic paint called ceramcote for filling and sealing. It works, but is so thick that it has to be painted on with a decent brush to not leave streaks. I had more success dipping them in a thinned mixture. But the real challenge is finding the right hook, and getting the cork mounted securely.
Cork poppers traditionally used a hump shank hook. These are still available (Mustad 33903) but this part drove me nuts because nearly every cork popper I have ever seen has a hook that seems to be about two sizes too small for the body. I wonder how they ever hook a fish. And I now know why. If you try to put a traditional cork head on larger hook, the hook diameter and shank kink are big enough to make it difficult. I ended up cutting a narrow notch to make it fit, and squeezing it back together gently in a vise after filling the notch with a drop of superglue. Most of my poppers looked like they were suffering from a bad case of eczema, but a trip to the drug store for emery boards made them look better. I then found that many, many, thinned coats of ceramcote are needed to get that nice finish you see on the racks of them that used to hang on cards in the hardware store. And by the way, coat the hook shank with tying thread if you really want any durability. Until I did that the prototypes would just twist around pretty easily.
I have a rule never to tie more than 3 or 4 of any prototype pattern in case it does not cast, stay together, or catch fish. Those four poppers have been on the bench for weeks, and I still need a couple more coats of varnish before they are even close to being ready. Those bags of pre-shaped foam ones and stinger hooks are looking better and better. It would be interesting to know how they actually mass-produced them back in the day, because I can't envision a production process that would allow them to be sold for the ridiculously low prices they sold for. I remember 3 or 4 for a dollar.
And by the way, I do not do any hackle wraps and have found they cast better and catch as many fish with just a sparse bucktail tail.
Saturday, November 22, 2014
Vanguard Binoculars and not exactly about fly fishing
I am doing a couple of odd posts because there wasn't much fly fishing this year. It was a rainy cool summer, and every weekend the rivers were too blown out to bother fishing, unless you owned a drift boat, and had a fishing partner capable of helping you row while you threw giant streamers and poppers. So I worked on getting ready for serious deer hunting.
Last year I had a new experience- big woods hunting for deer up along the NY/PA border. This is very different from Michigan hunting, where you put on about 17 layers of clothing and sit in one place for hours hoping something will pass by. It involves light clothing, and tracking. You work you way through the woods until you pick up a track, then follow it until you see the animal that made it. No matter where it goes, and for several miles. My two friends Matt and Mike excel at this, but for me it was a learning experience. In addition to more stamina, lighter clothing, organization skills, experience, skill, and woodcraft, they both had another thing I lacked: good binoculars. As they tracked, they would constantly glass the area in front of them. I had a cheap-ass pair of binocs that were so lame I did not like using them, and on two occasions I spooked deer that I should have or could have seen had I scanned. So I decided to get a real pair of hunting binocs.
Went to a big box outdoor store that had every brand ever made and tried them all. I had never looked through 20 different brands and models at once the differences were amazing. There were sort of three levels of optics: the 100 to 150 dollar range, the 350-450 dollar range, and then the insane dollar range. The expensive ones were not a possibility, and I was getting vexed because I did not see that much difference between the cheaper and mid-price brands that would justify the cost. I had about settled on an inexpensive pair that has become very popular with deer hunters, and then ran into the Vanguard rep. He asked me if I had tried their brand, and I said "no, because I have never heard of them." He handed me a pair of ED-II 8 x 30's (400 bucks), and I focused them on the eye chart that someone in the store had cleverly taped to a heating duct about 75 yards away. Whoa. It was the only pair where I could read the entire chart, and there was far less distortion at the edge of field. Color was spot on. Light. They were by far better than others in the same price, and even better than some of the more expensive ones. I took a pair home.
Vanguard is not new, but for years they made optics sold as house brands in other stores. They felt they could do better, and started selling their own stuff.
Anyway, the field testing was even better. They really are waterproof (although legally advertised as only water resistant), armored, light, and they do not fog up. Whoever designed the focus and diopter knobs was actually a hunter, because you can use both with gloves in really, really, cold weather. The part I like best is the focus, which is neither too coarse (you are rotating the knob back and forth to dial it in to the tiny sweet spot) or too fine (endless rotation to have an effect by which time the deer is out of sight). They are the binocs that I can look through all day without eye strain, and they added a new dimension to my experience. Although a hunting binocular, you could use these as your primary birding binocs too.
Note that I have no financial interest, and the bitches would not discount them for me either. I paid full price. But this is a rare case where I found something so good I wanted to tell other people about it. If you hunt, beg for these to appear under the tree this Christmas.
Monday, May 26, 2014
The Best Emerald Shiner Pattern Ever

I have long wondered about streamer patterns, and what I wonder is if any of the originators ever actually saw a real prey fish. The smelt imitations are the worst, but other minnow imitations are almost as bad. This one has been working like a charm on smallmouth, and it has supplanted most of my previous favorite patterns. I can take some credit, but it was based on a pattern I saw years ago by Bill Murdoch of the Tampa Bay fly fishing club. Anyway, I actually designed it to look like an emerald shiner. If you choose not to tie it, then it is on you because I gave you the pattern.
Hook: Gamakatsu B10S stinger, size 2
Body: none, but I am planning to tie a few with a thin copper flashabou wrap to resemble the lateral line. A base of white thread with pearl flashabou would probably be OK too, but you do not need a body.
Wing: A good bunch of white bucktail. Then layer 10-15 strands of chartreuse bucktail and a half dozen pieces of pearl Flashabou. Then 10-15 strands of olive bucktail, and 8-10 strands of green flashabou. More strands for bling, fewer for subtle. Top with either peacock herl or a synthetic substitute. I like herl better because nothing matches it, but flashabou is more durable, so I often used some of each.
Head: the tiedown of all those bulky materials leaves sort of a mess, so I put in a few wraps of red stuff to cover it all. You could use flashabou or krystal flash, but I think the one in the photo used red micro chenille or wool. This is optional, but it makes the fly look cool. Then wrap a fairly large head and whip finish. Twice. The head should be substantial to provide a base for the eyes.
Eyes: stick on fake eyes with superglue. Then add some of that UV cure clearcoat if you have it, or epoxy if you don't. I use Solarez because it is cheap and someday I might want to take up surfing and repair my surfboard. You need just enough to hold the eyes on permanently.
Emerald shiners were formerly common in the Great Lakes but became rare after Alewife proliferated. Recent declines in alewife have led to a comback, and everyone eats them. This fly gave me my best "insane numbers of really big smallmouth bass" day, the fly in the photo was the actual fly that provided the experience.
The one drawback to this pattern is that the materials occasionally wrap around the shank during fishing. It can't be helped (or at least I can't figure out a way to stop it) so you have to check it occasionally. To me, this is minor because it produces so well, but I had to point that out. But it is durable, the fly above is still pretty after over 25 bass.
Saturday, March 22, 2014
The double strike indicator revisited with remarkably bad photos

A reader asked me to post a photo of the double strike indicator rig. This was the only way to portray it, but you can see the two Kahuna strike indicator pieces that have been slid into position and secured by blood knots below each one. Gotta tell you, they seem kind of dumb when you are fishing for hard hitting smallmouth bass, but they will inform you of a surprising number of gentle takes that you would miss, or not detect for a few moments. The trick is to watch the two in relation to each other, and typically one starts moving in a different direction from the other. A blast to fish.
Thursday, March 13, 2014
Jeez, time flies
I had not put up any new posts for about a year, and had sort of lost interest in blogging. But then I went to the Midwest Fly Fishing Expo, and actually ran into 1) someone who had read my blog and liked it, and 2) encouraged me get the thing up and running again. Wow. Pretty pathetic that all it takes is one positive comment and I am again typing away, but hope springs eternal in the human heart.
The past year has been busy with the following events:
My first Montana trip in years, with the most uneven fishing I have ever experienced. There were good days, and poor days, and even one close to skunk day when I caught nothing. About 15 minutes before total darkness I tied on the biggest wooly bugger in the box and started swinging it aimlessly. Caught a nice rainbow as the sun set. On the other hand, on another day I hooked a Chinook sized brown on a size 18 BWO nymph presented with a cane rod. It didn't last long, but it was glorious. And I did land a huge rainbow that rocketed up from the depths of a tiny pool up in the Gallatin headwaters to take a dry fly. So going back for more.
A night where I stood on a rock and caught over 30 large smallmouth from a single spot. After it finally died down I made a cast back to the rock itself and hooked the largest fish I have taken from that river. Nineteen inches, but rather slim and only a few pounds.
Answered a craigslist ad for large lot of fly tying material, and when I picked it up the guy said "there was more stuff under the steps than I thought, so there are some extra boxes of junk". The extra boxes were filled with unopened Metz saddles in their original bags. I recouped the cost by selling 2 of the 3 vises I found in the stash, and most of the nylon rod winding thread.
Did a wonderful hunt with two friends from grad school in the big woods country of Pennsylvania. No deer were harmed, but I saw more in one day than in several years of hunting in Michigan. That along with all sorts of wildlife sightings.
My lovely and adorable wife got me a Dyna King vise for Christmas. They are worth every penny she paid.
Started making cane rods again after a long stretch of not making them.
Waited patiently for Orvis to call me with an offer of a Helios2 and Mirage reel if they could include the smiling minnow in their catalog. Still hopeful, but I might have to send them some. Seriously, I have gotten a lot of feedback on the pattern. Everyone says the exact same thing:" I thought you were nuts, but that thing really works!" You heard it here first. New readers, check out the older posts.
Watched my beloved Michigan Department of Natural resources be transformed from a resource management agency into an arm of Michigan's agriculture, logging, and mining industries via the worst legislature in the history of this state.
Wednesday, February 13, 2013
How to save badly used and matted flies
Put them in a hemostat and hold them in the steam from a tea kettle for a few seconds.They will be like new unless chewed excessively by fish.
I thought that everyone knew about this but I learned that this trick has been largely forgotten.
I thought that everyone knew about this but I learned that this trick has been largely forgotten.
Tuesday, January 22, 2013
The ultimate round goby fly
 | |||||
| I decided to reward all the readers who are still visiting after the NRA post with something useful. if you do not know about it, round gobies invaded the Great Lakes during the late 1990's and are now ubiquitous. They have many negative effects, but are eaten by just about every predator out there, including Atlantic salmon. Everyone eats gobies, and anglers have begun using goby imitations (most states prohibit their use as live bait). Berkeley actually makes a power bait in the size and shape of a goby, and there are a variety of soft plastic baits that imitate them. These are especially popular with smallmouth bass anglers. There are also a variety of fly patterns out there, but I just was not satisfied with any of them. They either swam with the hook down, were very difficult to tie, or just did not look like a goby to me. Now, you know well of my disdain for those who modify a famous pattern with a minute change and name it after themselves, but I decided that would try to create a new goby pattern. Here it is. |
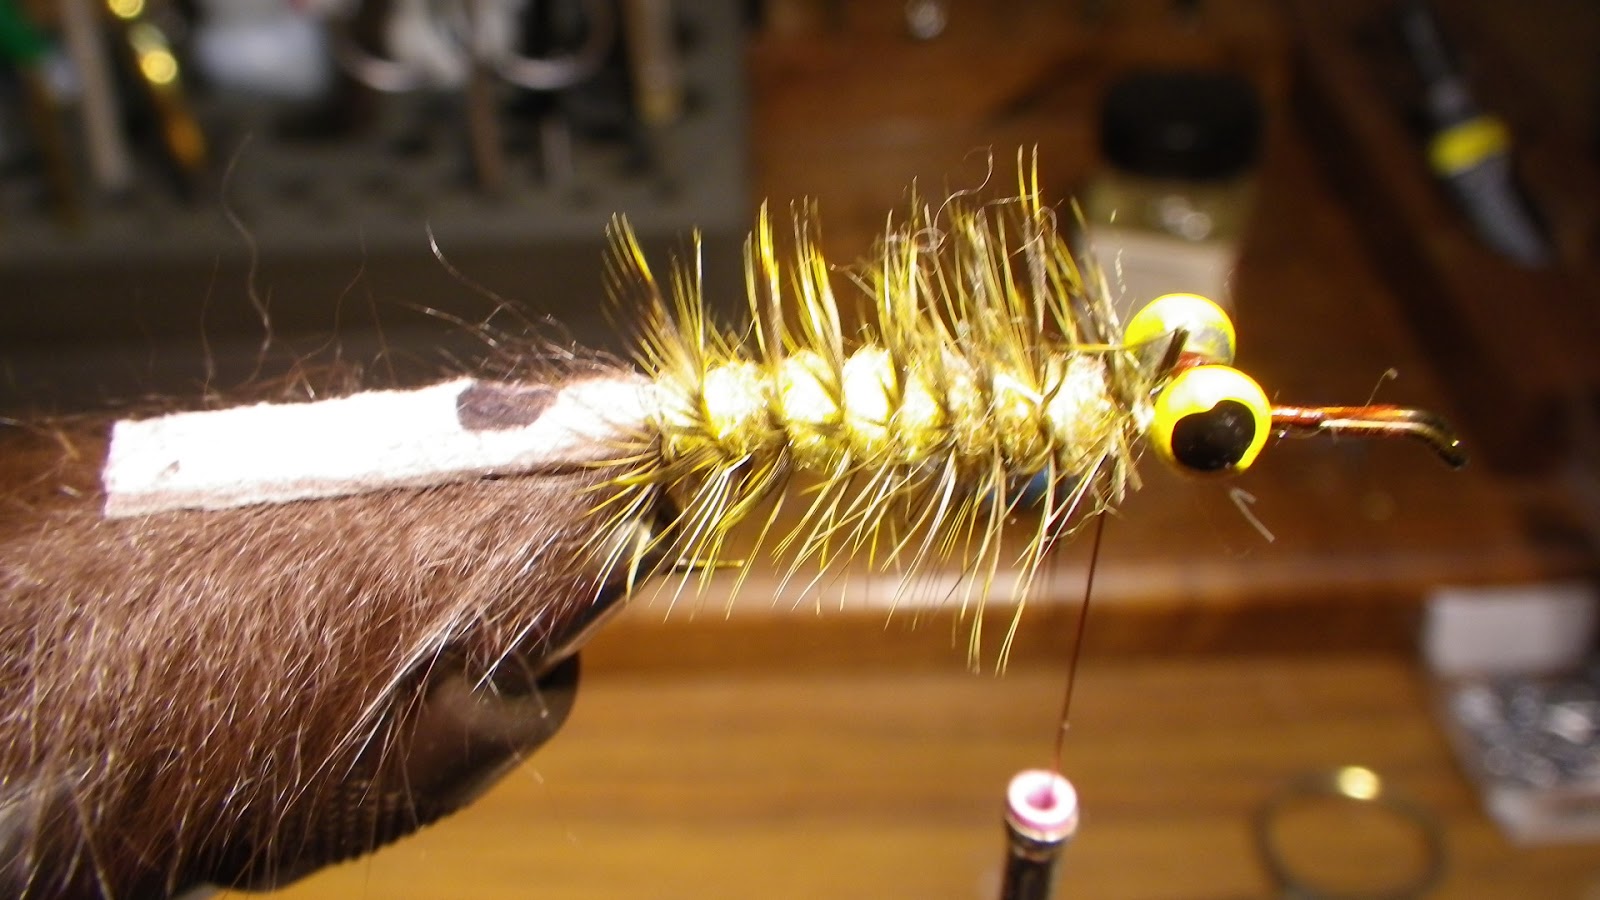


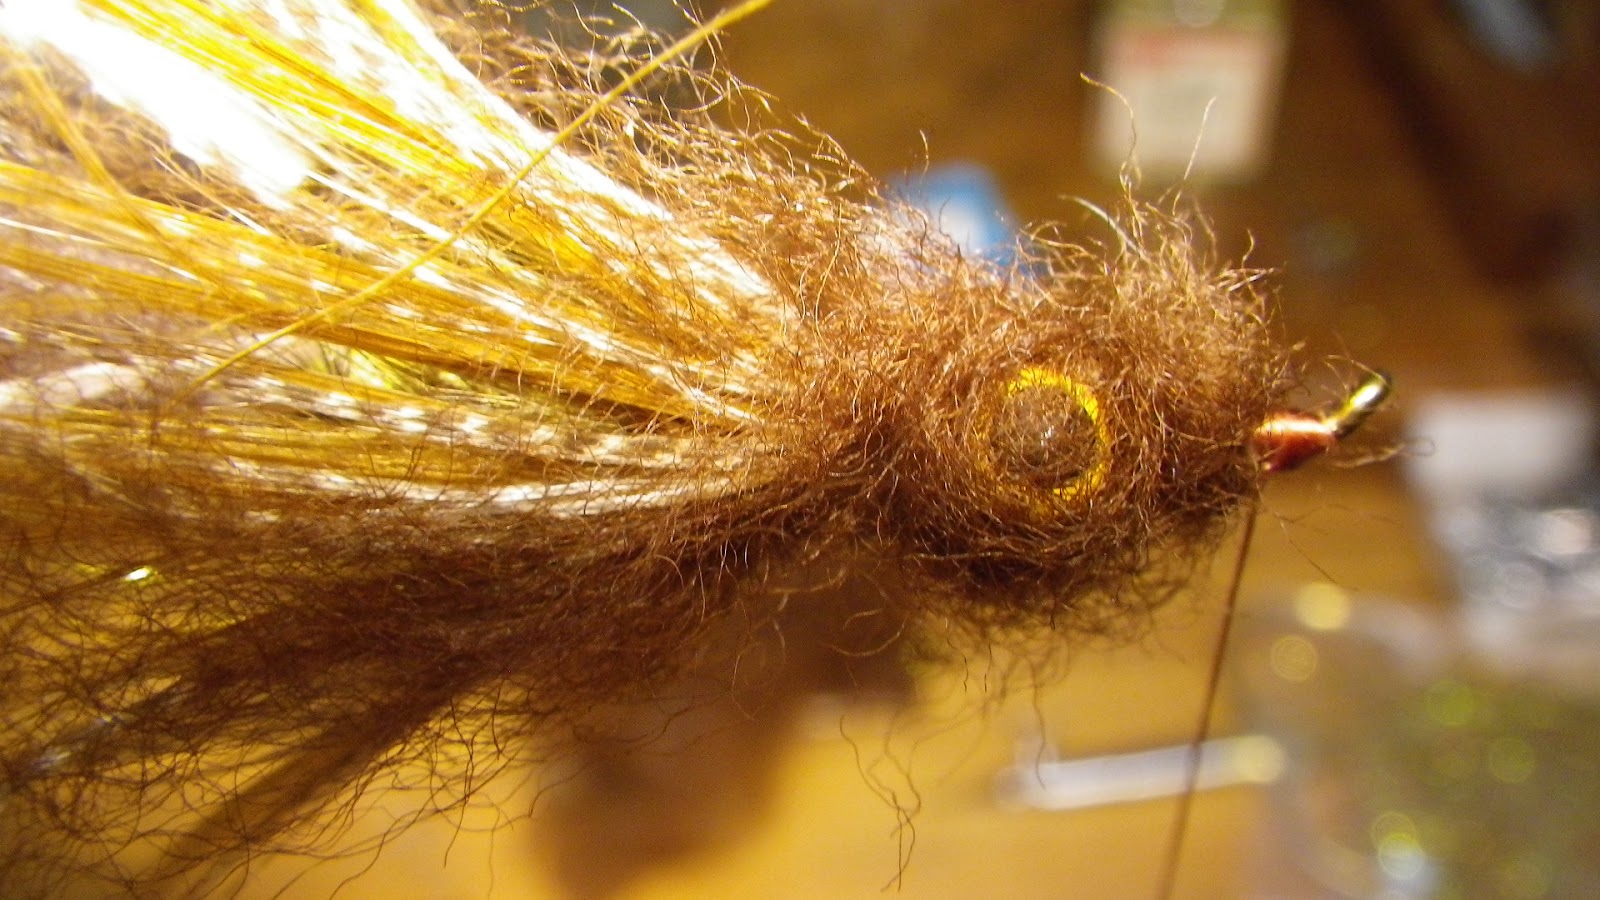
What I like about this one is that it sinks fast, is pretty tough, and it seems to capture the true nature of gobies, which are brown and olive with a yellow sheen. Enough flash to make it stand out, but they are not a shiny pretty fish. The materials capture the profile pretty well, I must say, to the point where I am so expecting a bidding war between Orvis and Umpqua Feather Merchants.
BTW, this fly grew out of a dozen really awful prototypes that were nightmares. One looked like a bluefish had chewed on it, another like it had ingested large quantities of tritium. The marabou tail version looked like a goby with a missing tail, and the deer hair head version was such a pain to get right that you wanted to go over and toilet paper Chris Helm's yard for making you think that you too could tie like he does. Because it is an impressionistic fly, it's official name is the go-again goby, after that famous impressionist painter Paul Gauguin. If you ever get a chance to see his work at the Met in NYC, go. You will be a better person. And the prototype fly will be gifted to the person who can give the correct literary attribution on how Gauguin became known as "that go-again fellow".
Subscribe to:
Posts (Atom)